

Introduction
In this tutorial, you will be guided to build powerful chatbots on Power Virtual Agents(PVA) and then host it on SharePoint using SharePont Framework. PVA is a new service from Microsoft that just came out of public preview in mid 2020. It allows users to easily build powerful and complex chatbots using a no-code user interface. If used together with SharePoint, it empowers companies to easily build chatbots for their company intranets that can answer employees’ frequently asked questions, find people or documents and more. This post is a step by step guide on how you can build a chatbot using PVA and host it on SharePoint using SPFx extensions.
Prerequisites
- PVA license (Free Trial available)
- An existing SharePoint Site
- Basic React knowledge
- Node.js v10.x
- SPFx setup (Official Setup Guide)
1. Creating a bot on PVA & obtain bot ID
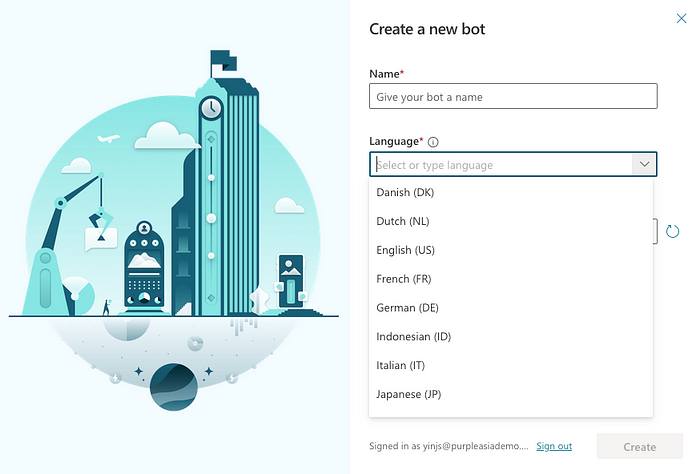
Head over to the PVA Portal and follow the on-screen step-by-step instructions to create your PVA bot. In here, you will be able to choose what language you want your bot to understand. Currently, you can only have 1 language per bot.
 From the left panel, select "Manage > Channels" and then select "Custom Website". Copy the Bot ID and paste it somewhere, we will need it later.

2. Create SPFx extension
We will need to create a SPFx extension in order to host our PVA bot on SharePoint. SPFx extension allows us to deploy our bot to all pages in a single site. If you just want to create a bot in a single page, you can use SPFx web parts instead.
To create a SPFx extension, open your command line and in the folder that you want to create your SPFx extension, run the command below and key in the following values. Feel free to change the name and description to something to your liking.
yo @microsoft/sharepoint

What is your solution name? pva-chatbot
Which baseline packages do you want to target for your component(s)? SharePoint Online only (latest)
Where do you want to place the files? Use the current folder
Do you want to allow the tenant admin the choice of being able to deploy the solution to all sites immediately without running any feature deployment or adding apps in sites? No
Will the components in the solution require permissions to access web APIs that are unique and not shared with other components in the tenant? No
Which type of client-side component to create? Extension
Which type of client-side extension to create? Application Customizer
What is your Application Customizer name? PVAChatbot
What is your Application Customizer description? PVAChatbot description
Make sure you are on Node.js v10.x, see the SPFx Extension Getting Started Guide if you are stuck.
3. Modify SPFx Extension to host PVA Bot
Install Bot Framework Web Chat using the command below:
npm install botframework-webchat
Create a "Chatbot.tsx" file in "src/extensions/<project_name>" and paste the following code into the file. Make sure you change the BOT_ID variable on line 25.
import * as React from "react";
import { useBoolean, useId } from '@uifabric/react-hooks';
import * as ReactWebChat from 'botframework-webchat';
import { Dialog, DialogType } from 'office-ui-fabric-react/lib/Dialog';
import { DefaultButton } from 'office-ui-fabric-react/lib/Button';
import { Spinner } from 'office-ui-fabric-react/lib/Spinner';

export interface IChatbotProps { }

const dialogContentProps = {
    type: DialogType.normal,
    title: 'PVA Chatbot',
    closeButtonAriaLabel: 'Close'
};
export const PVAChatbotDialog: React.FunctionComponent = () => {
    const [hideDialog, { toggle: toggleHideDialog }] = useBoolean(true);
    const labelId: string = useId('dialogLabel');
    const subTextId: string = useId('subTextLabel');
    const modalProps = React.useMemo(
        () => ({
            isBlocking: false,
        }),
        [labelId, subTextId],
    );
    const BOT_ID = "YOUR_BOT_ID";
    const theURL = "https://powerva.microsoft.com/api/botmanagement/v1/directline/directlinetoken?botId=" + BOT_ID;
    const store = ReactWebChat.createStore(
        {},
        ({ dispatch }) => next => action => {
            return next(action);
        }
    );
    fetch(theURL)
        .then(response => response.json())
        .then(conversationInfo => {
            document.getElementById("loading-spinner").style.display = 'none';
            document.getElementById("webchat").style.minHeight = '50vh';
            ReactWebChat.renderWebChat(
                {
                    directLine: ReactWebChat.createDirectLine({
                        token: conversationInfo.token,
                    }),
                    store: store,
                },
                document.getElementById('webchat')
            );
        })
        .catch(err => console.error("An error occurred: " + err));

    return (
        <>
            <DefaultButton secondaryText="Opens the Chatbot Dialog" onClick={toggleHideDialog} text="Open Chatbot Dialog" />
            <Dialog styles={{
                main: { selectors: { ['@media (min-width: 480px)']: { width: 450, minWidth: 450, maxWidth: '1000px' } } }
            }} hidden={hideDialog} onDismiss={toggleHideDialog} dialogContentProps={dialogContentProps} modalProps={modalProps}>
                <div id="chatContainer" style={{ display: "flex", flexDirection: "column", alignItems: "center" }}>
                    <div id="webchat" role="main" style={{ width: "100%", height: "0rem" }}></div>
                    <Spinner id="loading-spinner" label="Loading..." style={{ paddingTop: "1rem", paddingBottom: "1rem" }} />
                </div>
            </Dialog>
        </>
    );
};

export default class Chatbot extends React.Component<IChatbotProps> {
    constructor(props: IChatbotProps) {
        super(props);
    }
    public render(): JSX.Element {
        return (
            <div style={{ display: "flex", flexDirection: "column", alignItems: "center", paddingBottom: "1rem" }}>
                <PVAChatbotDialog />
            </div>
        );
    }
}
Head over to "<project_name>ApplicationCustomizer.ts" file, and paste the code below. This will create a Bottom Placeholder across all your pages in the SharePoint site and within the placeholder, it will render the Chatbot Component that we just created.
import { override } from '@microsoft/decorators';
import { Log } from '@microsoft/sp-core-library';
import * as React from "react";
import * as ReactDOM from "react-dom";
import {
  BaseApplicationCustomizer,
  PlaceholderContent,
  PlaceholderName
} from '@microsoft/sp-application-base';
import * as strings from 'PvaChatbotApplicationCustomizerStrings';
import Chatbot from "./Chatbot";

const LOG_SOURCE: string = 'PvaChatbotApplicationCustomizer';

/**
 * If your command set uses the ClientSideComponentProperties JSON input,
 * it will be deserialized into the BaseExtension.properties object.
 * You can define an interface to describe it.
 */
export interface IPvaChatbotApplicationCustomizerProperties {
  Bottom: string;
}

/** A Custom Action which can be run during execution of a Client Side Application */
export default class PvaChatbotApplicationCustomizer
  extends BaseApplicationCustomizer<IPvaChatbotApplicationCustomizerProperties> {
  private _bottomPlaceholder: PlaceholderContent | undefined;
  @override
  public onInit(): Promise<void> {
    Log.info(LOG_SOURCE, `Initialized ${strings.Title}`);
    // Wait for the placeholders to be created (or handle them being changed) and then
    // render.
    this.context.placeholderProvider.changedEvent.add(this, this._renderPlaceHolders);
    return Promise.resolve<void>();
  }

  private _renderPlaceHolders(): void {
    // Handling the bottom placeholder
    if (!this._bottomPlaceholder) {
      this._bottomPlaceholder = this.context.placeholderProvider.tryCreateContent(
        PlaceholderName.Bottom,
        { onDispose: this._onDispose }
      );

      // The extension should not assume that the expected placeholder is available.
      if (!this._bottomPlaceholder) {
        console.error("The expected placeholder (Bottom) was not found.");
        return;
      }
      const elem: React.ReactElement = React.createElement(Chatbot);
      ReactDOM.render(elem, this._bottomPlaceholder.domElement);
    }
  }
  private _onDispose(): void {
  }
}
4. Serving & testing locally on SharePoint
Head over to "config/serve.json" and change the pageUrl to your own SharePoint site url.
{
  "$schema": "https://developer.microsoft.com/json-schemas/core-build/serve.schema.json",
  "port": 4321,
  "https": true,
  "serveConfigurations": {
    "default": {
      "pageUrl": "https://<YOUR_SHAREPOINT_DOMAIN>.sharepoint.com/sites/<YOUR_SHAREPOINT_SITE>",
      "customActions": {
        "8541004f-b8f6-4863-a3fd-0721ec95f7cd": {
          "location": "ClientSideExtension.ApplicationCustomizer",
          "properties": {
            "testMessage": "Test message"
          }
        }
      }
    },
    "pvaChatbot": {
      "pageUrl": "https://<YOUR_SHAREPOINT_DOMAIN>.sharepoint.com/sites/<YOUR_SHAREPOINT_SITE>",
      "customActions": {
        "8541004f-b8f6-4863-a3fd-0721ec95f7cd": {
          "location": "ClientSideExtension.ApplicationCustomizer",
          "properties": {
            "testMessage": "Test message"
          }
        }
      }
    }
  }
}
Run the command below to serve locally and test
gulp serve
If you see "Unable to connect" error message in the popup window, it means your BOT_ID is incorrect. Double check your BOT_ID on line 25 of the Chatbot.tsx file.
5. Deploy on SharePoint
Run the following commands to build your SPFx extension
gulp bundle --ship
gulp package-solution --ship
You should see a ".sppkg" file being generated in your "sharepoint/solution" folder. Upload this file to your tenant's SharePoint App Catalog.
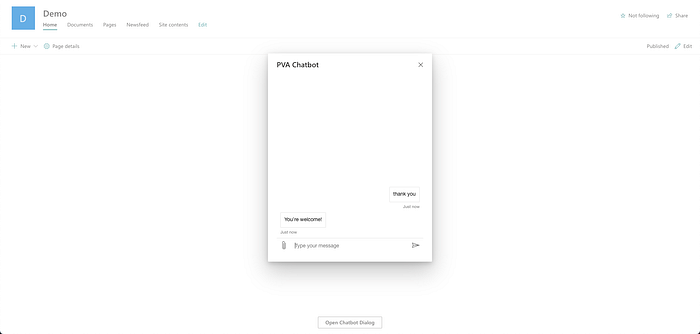
Head over to your SharePoint site that you want to add this Chatbot to. Click on "+ New > App" and then select the newly uploaded extension file and you should see "Open Chatbot" button at bottom of your SharePoint page.
 Refer to the official SPFx extension deployment guide if you are stuck.
Conclusion
This is only the first step, from there you can extend more functionality to your PVA chatbot. Link it up to Power Automate and you achieve some pretty complex features, such as searching for documents, finding people in Azure AD or even link up to external API via Power Automate connectors.
Want to customise your bot UI on the extension? Want to build more topics on PVA but not sure how? Have more complex use cases but not sure how to build it? Feel free to reach out!